Giman
Product and Deals Landing Page Template
created: 06/29/2016 by: Works of Wisnu email: xwisnux@worksofwisnu.comProduct and Deals Landing Page Template
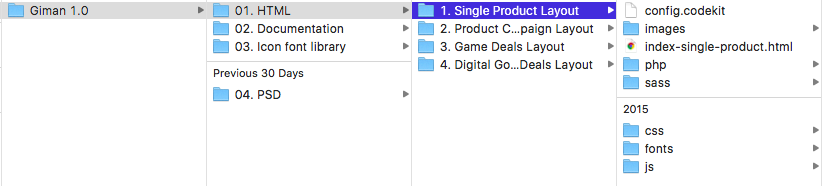
created: 06/29/2016 by: Works of Wisnu email: xwisnux@worksofwisnu.comAll files and folders are well organized.
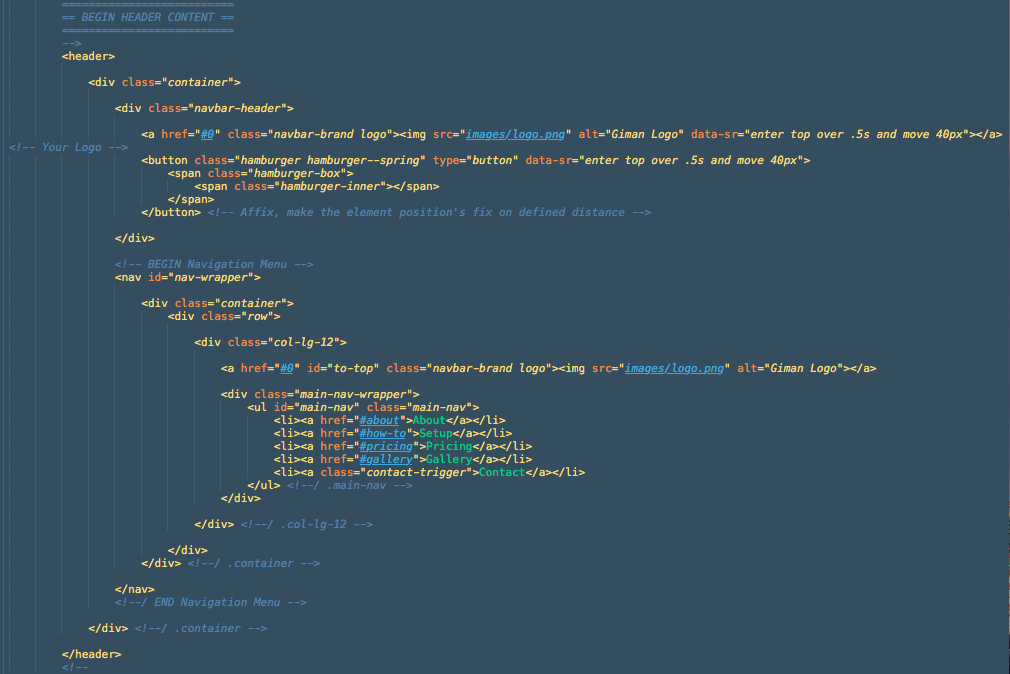
Above is the screenshot of the header section, inside .navbar-header there are place for your Logo and also hamburger-button to trigger the navigation menu. To change the logo, you can simply adjust the image source into the path of your logo file.
Inside nav id="nav-wrapper" you will find two main elements, there are logo and navigation links. The logo here is similar with the one we have above but will appear when navigation wrapper slided down.
Move to main-nav there are links which scrolling to any section of target, you can adjust your navigation links here. Also there is a link with class contact-trigger which any of elements with this class will trigger the contact overlay.
If you want to add external link on the navigation, simply add .external class on the anchor link. For example:
<li><a class="external" href="http://google.com">Google</a></li>
To change the background image, find the following section on main.css file:
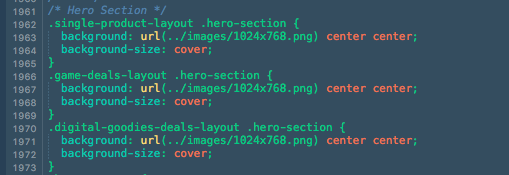
If you're using the scss file, you can find it on _header.scss file inside sass > partials folder.
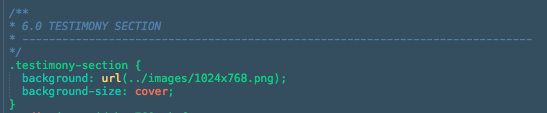
The background settings for certain section were written inside every section on main.css file. For example the background setting for testimonial section can be found at section number 6.0 TESTIMONY SECTION, and for the scss is on _testimony-section.scss file:
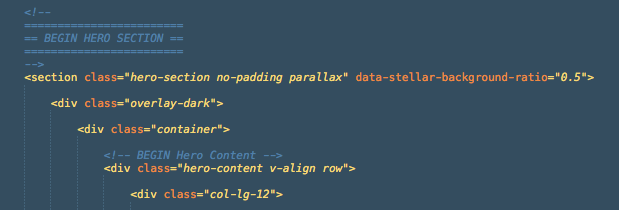
To obtain parallax effect, we should add attribut data-stellar-* to the section which has background image, for example:
For more details about parallax setting, please read the Stellar's official documentation here.
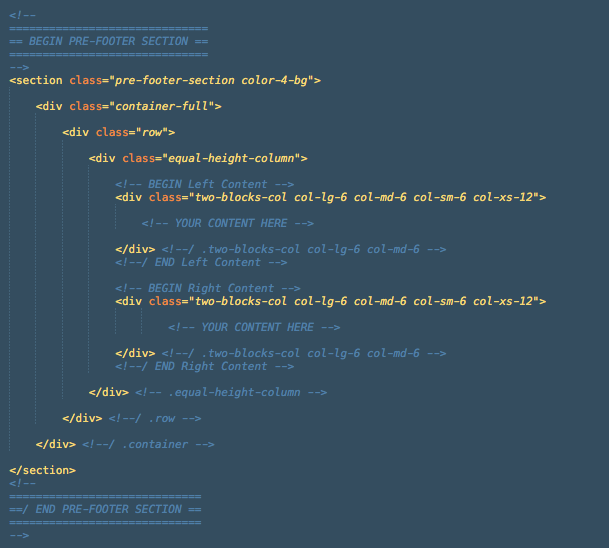
Urip used class="container" from Bootstrap to wrap content and house the grid system. Therefore it has maximum width of 12 columns (1170px width on desktop screen). To make a full width column you need to change class container into class="container-full".
To make vertically center content like Hero section you need to add v-align class to any div which wrapping columns.

Initially there is only one pricing element in this template, and it's called a pricing banner. Here is the basic code to create a pricing banner:
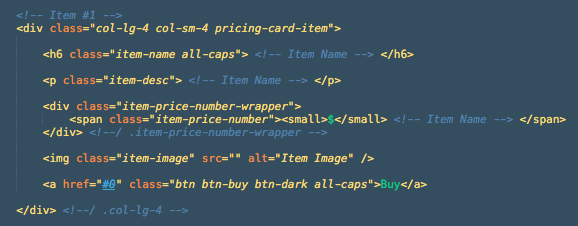
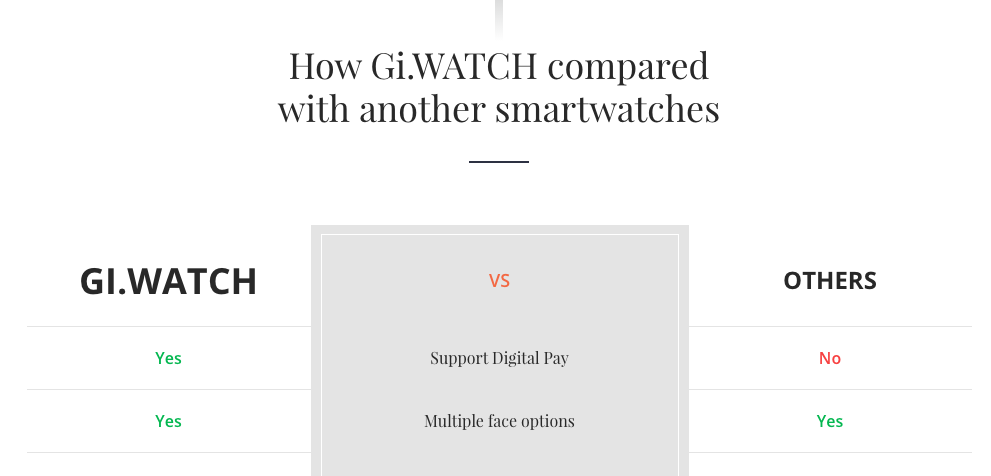
item-name - put your item's name hereitem-desc - simple description about your item hereitem-price-number - put your item's price here. Small tag is for the currency.item-image - put the source of your image herent-buy - button to redirect customer to your purchase pageYou can find the comparison table on Campaign Layout. For now the comparison table only support two comparator, and below is the code to make comparison table:
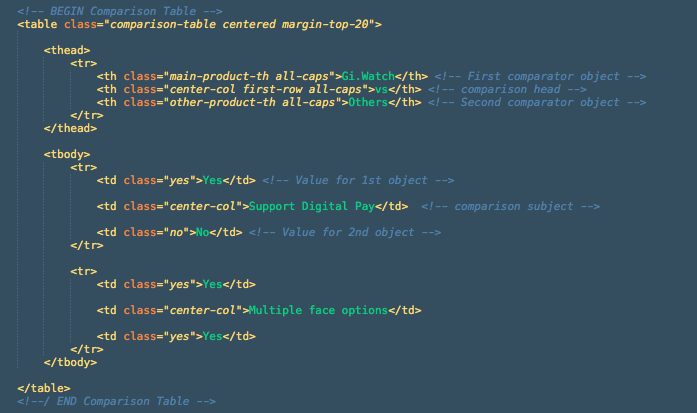
and the result is:
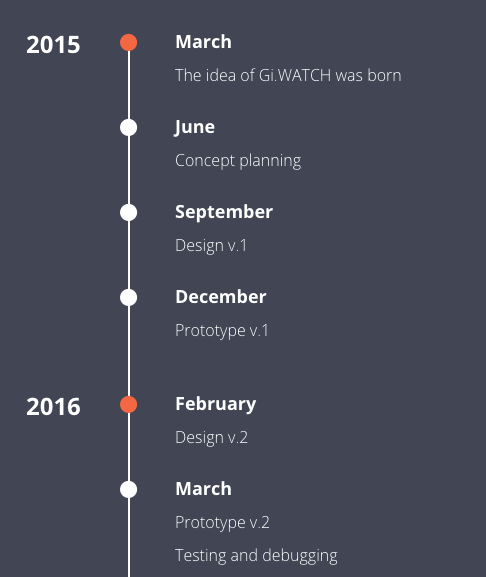
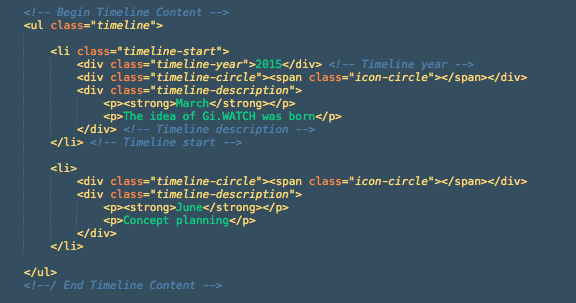
Below is the code to create timeline:
This template uses Isotope plugin as content filter. You should call the plugin js file and giman-isotope-setting.js on your HTML (currently only index-digital-goodies-deals.html which has been included these script on the package).:

There are two main elements for this content filter, first is the Filter button:
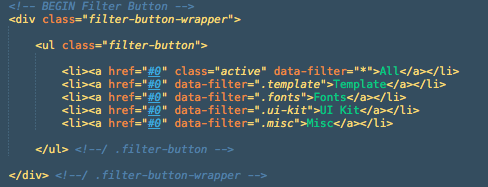
The attribute data-filter is the class of the filter items which used as category, while the * mark indicating all categories. The next element is Filter item:
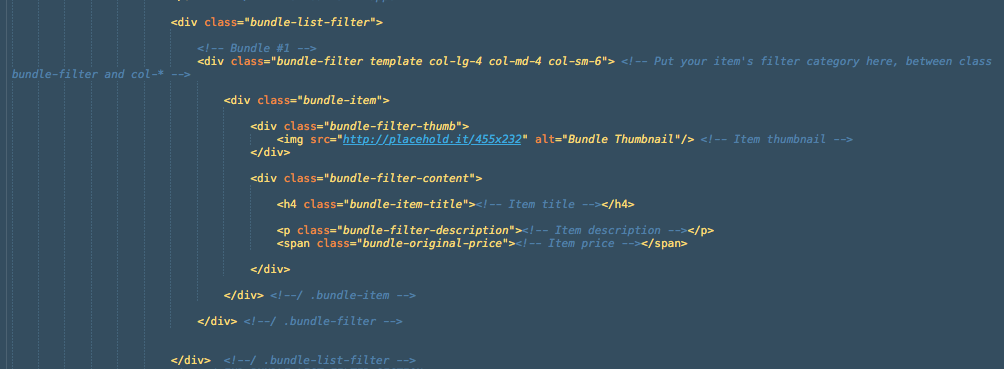
All items are wrapped with div class bundle-list-filter, and each item has div class bundle-filter, you can place your category class along with this div.
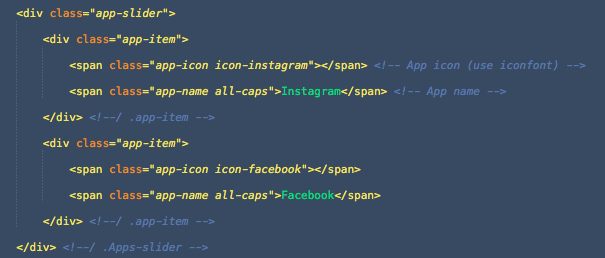
To display Carousel, please include slick.min.js and giman-slick-carousel-setting.js to your HTML. Giman uses Slick carousel feature on testimony section, app slider (index-single-product.html) and logo slider(index-game-deals.html).

To display Countdown Timer, please include jquery.countdown.min.js and giman-countdown-setting.js to your HTML.

then open giman-countdown-setting.js file, there you will find some date like this '2016/07/14', replace with your desired date. And finally deploy <ul class="countdown-timer"></ul> to your HTML file to display the timer. For more details about Countdown Timer plugin please visit its official documentation here.
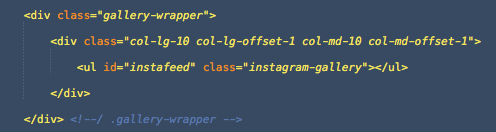
To display Instagram Gallery like on the Single Product layout, please include instafeed.min.js and giman-instafeed-setting.js to your HTML.

Below is the HTML complete structure to display the gallery, but basically you just need to create an ul with id="instafeed":
The next step is to adjust the access token and user Id of your Instagram account to the giman-instafeed-setting.js file
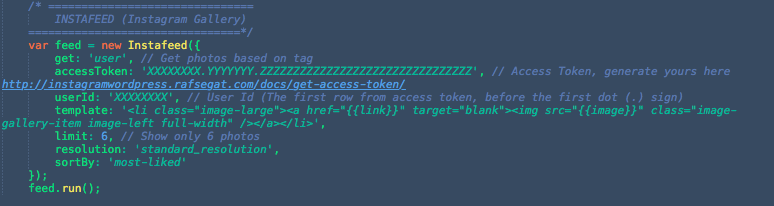
Visit this page to generate your Instagram access token: Access Token Generator. Put your access token and to the accessToken option, copy the first line of your accessToken (before first dot sign) to the userId option. For more complete details please read the Instafeed documentation page.
Giman has integrated MailChimp service subscribe form usingjQuery Ajaxchimp.
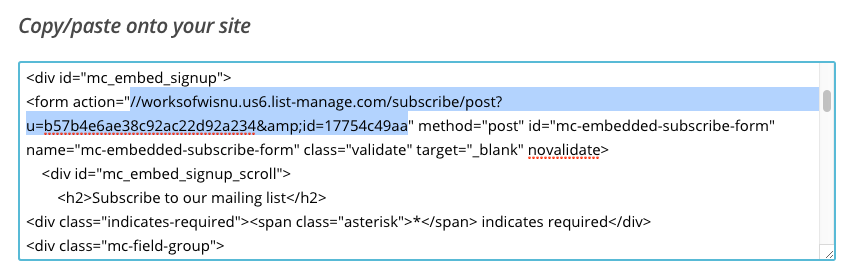
Open giman.js file and find the 8. AJAXCHIMP (jQuery Mailchimp Subscribe) section, replace the URL with your own mailchimp post URL

Just login to your Mailchimp account, go to your list or create a new one, head to the Signup Forms menu, select Embedded Form. There you will find "Copy/paste onto your site" section, find the URL inside form action="".
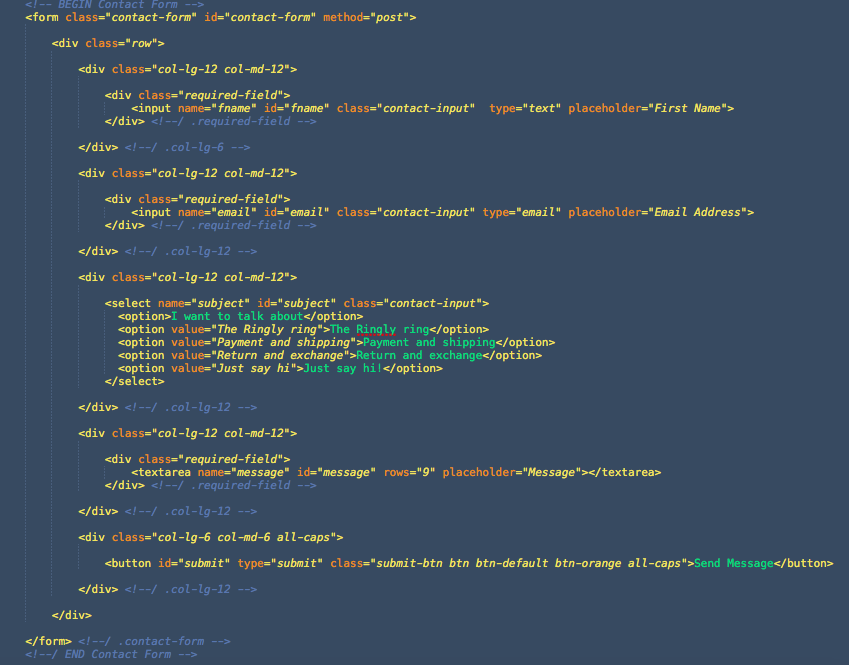
Contact form use contact.php to send the message to your email. The contact form overlay will appear when a link with class="contact-trigger" clicked. To adjust the recipient address, please open the contact.php file, change the value of $to variable.

To adjust the form to meet what you need, you can edit the name, id, and placeholder of an input. A field under div class="required-field" will have a red dot right before the input appears when there is/are error(s) with the input. Below is a screenshot of the existing contact form:
Before the contact message sent, it needs to be validated to check whether all required fields have been filled correctly. To adjust the validation process, please open the giman.js file and head to section number 7, Contact Form Validation. You will find some validation code like this:
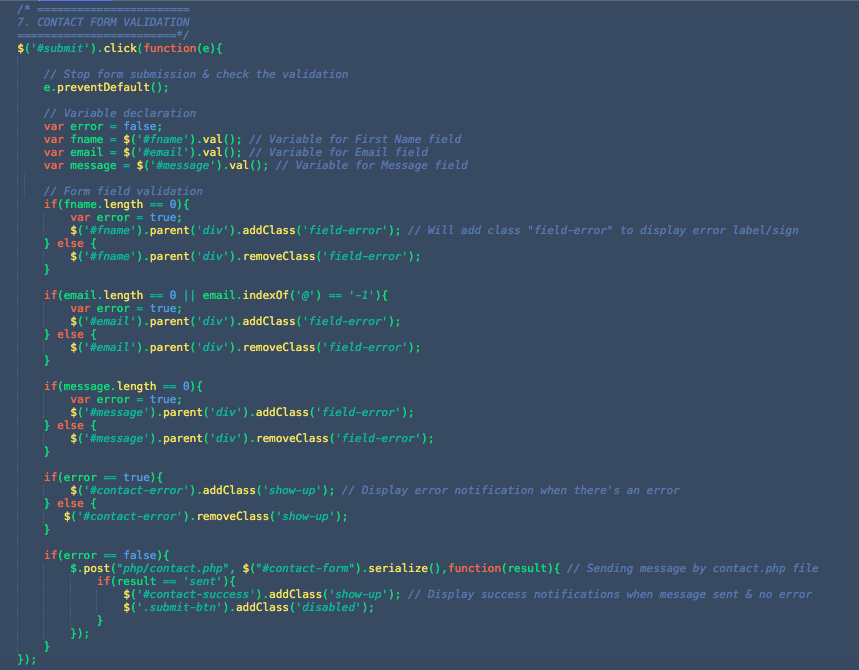
If you have custom field on your contact form, first you need to define the variable, give a variable name and define the id of the input. After that you need to define the validation just like code below // Form field validation comment. If the error variable is true then the error notification will appear and give a class of field-error to the parent div. If all the validation processes finished and no error found then the contact message will be sent using contact.php
Since Giman version 1.1 it has been added the compatibility with 2 major e-commerce/selling platform, Selz and Sellfy. Both are famous platforms that allow you to easily sell your digital products. Currently this template support/compatible with embed button from those platforms, although you can also manage other type of embedded media provided like product or store widgets.
You can find the example integration for Selz in Giman Digital Goodies layout (index-digital-goodies-deals-selz.html). Click the 'Buy Now' buttons to see the overlay widget of the item like this:

To create Selz embed button, make sure you have one published/active item at Selz. And the setup to accomplish the overlay functionality is easy:
If you're not using index-digital-goodies-deals-selz.html template, then include Giman Selz JS setting in your page:
<!-- GIMAN Selz JS Setting -->
<script src="https://cdn.selz.com/jquery/1.0.13/jquery.selz.min.js"></script>
<script src="js/custom-plugin-setting/giman-selz-setting.js"></script>
To adjust the color of button and checkout header, open the giman-selz-setting.js file then change the hexa color value inside
theme setting.
Include jquery.selz.min.css or add your stylesheet into the <head> of your page.
<!-- Selz Style integration -->
<link href="https://cdn.selz.com/jquery/1.0.13/jquery.selz.min.css" rel="stylesheet">
Add the short link to your Selz.com products into the <body> of your page. This can be found on the share item page within Selz. For example:
<a href="http://selz.co/VJDM9dDYZ" class="btn btn-default">Buy Now</a>
That's all, for more details please check official Github account of Selz: https://github.com/selz/jquery.selz#basic-setup. Happy selling!
You can find the example integration for Sellfy in Giman Game Deals layout (index-game-deals-sellfy.html). Click the 'Buy Now' buttons to see the overlay widget of the item like this:

To create Sellfy embed button, make sure you have one published/active item at Sellfy. And the setup to accomplish the overlay functionality is easy:
If you're not using index-game-deals-sellfy.html template, then include Giman Sellfy JS Setting in your page:
<!-- GIMAN Selz JS Setting -->
<script src="https://sellfy.com/js/api_buttons.js"></script>
Add the link to your Sellfy.com profucts into the <body> of your page. Then add classes sellfy-buy-button sellfy-buy-button-custom to the anchor tag.
<!-- BEGIN Sellfy Embed button -->
<a href="https://sellfy.com/p/FeUo/" id="FeUo" class="sellfy-buy-button sellfy-buy-button-custom">
  <span class="btn btn-default btn-dark-orange all-caps">Buy for $20</span>
</a>
<!-- END Sellfy Embed button -->
That's all, for more details please check the official Documentation of Sellfy here: http://docs.sellfy.com/article/19-how-to-add-the-buy-now-button-on-your-site. Happy selling!
Below is the list of jQuery plugins used in Giman template. Visit their website to find more documentation:
Inside the js folder you will find giman.js file, this file is the set up for some javascript plugins above for all layouts of this template, and inside custom-plugin-setting folder you will find the js setting files for plugin that needs dependency.
I've used the following images, icons or other files as listed. *for demo only
That's all! Please let me know if I missed something here :)